Installation Apache Web Server on Windows 10 Manual
Install Apache Web Server to your Windows 10.

1- Download Apache Web Server from ApacheLounge
- ApacheLounge Downloads: https://www.apachelounge.com/download/
- Apache 2.4.57 x64 Direct Download: https://www.apachelounge.com/download/VS17/binaries/httpd-2.4.57-win64-VS17.zip
2- Create a new folder and change name it to "SERVER". For example, I created a "SERVER" Directory in my D: Drive.
When the download is complete, open the ZIP file and extract all files to your D:\SERVER directory.
Before installing the Apache Web Server Service, we will make some changes to the Apache httpd.conf file. Let's open our httpd.conf file with any text editor.
3- Open the httpd.conf file and search:
Define SRVROOT "c:/Apache24"and change to:
Define SRVROOT "D:/SERVER/Apache"Then, save and exit.
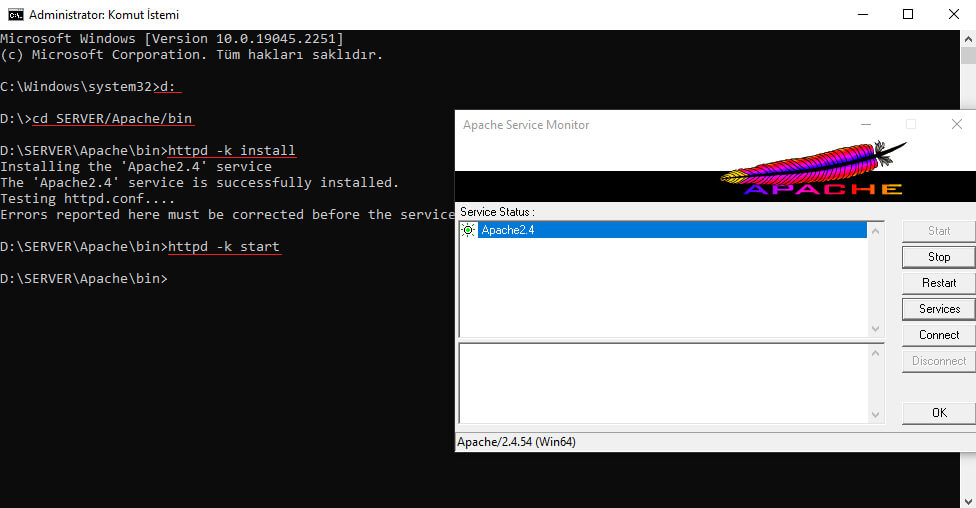
4. Open the Search Menu and type CMD and run it as Administrator Rights.
- You have to go Apache Folder.
Command 1: Type D: and press Enter key.
Command 2: Type cd SERVER\Apache\bin and press Enter key.
Command 3: Type httpd -k install and press Enter key, wait for the installation.
Command 4: Type httpd -k start and press Enter key and Start Apache Web Server Service.
That's all!
What's Your Reaction?


